
Control your light bulbs with a Cisco Video Codec
- Feb 15, 2018
- 8 min read
Not that you need this functionality in your home or office always, but if you have a Cisco Telepresence endpoint , why not have that function. You are sitting in your office and you want to turn off your bedroom bulbs or dim your office light which is too bright. I dont live in a home but i have a very connected apartment in a lot of ways. Every household is getting that way. Every infrastructure that used to be in its own island are getting connected. Every product i buy today , the first thing i think of is whether can i control it from Alexa ? The Alexa to Hue integration is pretty seamless once you futz with it through your iphone Hue app and Alexa app. But i may not be near an Alexa but hey i have a DX80 sitting at my desk i want a slider button to dim the light and turn it on off. That is what i am going to demonstrate here. Here is a short youtube video on the same but if you like to see how this was all done, continue reading below.
For this i am using a raspberry pi where i have some of my code waiting for events. Most of my programming is based on NodeJS and Javascript although the logic is easily repeatable to other programming languages like Python or PHP. A Phillips HUE bulbs and bridge is what i have and use here but you can work with SmartThings or WEMO or what not once you figure out their APIs. The configuration of this is four fold.
Ensure your HUE bulbs are controlled via the HUE Bridge and then from your computer you are able to talk to the HUE bridge via POSTMAN or browser using the HUE bridge API key.
In-Room Control Editor configuration on the DX80 (or any Cisco video endpoint). This can be Spark or CUCM registered endpoint. This enables buttons on the home screen or the panel up top on a Cisco codec that you can press to turn on/off the bulb or dim with a slider.
Configuration of node.js on your raspberry PI to receive the commands to turn on/off/dim bulb from the codec. My code once processes the signals send the appropriate commands to Hue Bulb to execute the commands. The PI acts as a translator between the two devices.
If the bulb was turned on/off with your iphone or lets say you had Alexa integration, that status needs to be udpated back to the Codec in real time so that the buttons you created in step 1 accurately reflects current state of the bulb
Well i hope you all are with me so far and following. The first step as i discussed above is to make sure all bulbs are paired with your Hue bridge and the bridge is accesible via your network and responding to a browser request, simply point to the IP of the bridge. This is to make sure that bridge is alive. You should get a page like this.

1. Setup the Philips HUE Bridge with API access
I am not going into details how you open the HUE bridge out of the box and setup the bulbs. Thats easy. Please RTFM.
To access the HUE API you need a special username that you create on this same IP address using a HTTP POST. All the detailed steps are in this link very well described. https://www.developers.meethue.com/documentation/getting-started. This API username is then used to query the status of bulbs etc. For in my case my User name was already generated and is NYJC00ZQX3rkxIYOBa7cEO-q1ejtKiPrJzgdT0OX
Every one will have a different user ID created using the above process. To access the bridge now using this user id you will have to use the URL http://192.168.2.102/api/NYJC00ZQX3rkxIYOBa7cEO-q1ejtKiPrJzgdT0OX/
I have 5 different Phillips HUE bulbs at home, some color, some white but if you were to pull up this URL on a web browser you can see the following output. You can see below that this bulb 3 is a color bulb indicated by color mode "CT" Not only does the bulb has a brightness settings (254 - full brightness) it has HUE and Saturation which controls the color shade. Although this exercise is not going to demonstrate changing Hue and Saturation, it could be modified via API. We are interested in only two things. State : ON : TRUE and BRI: 254. If we modify this value to ON: FALSE (technicaly off) we have turned off the bulb. If we set the BRI value to 128, we have now set the brightness to half the value or pretty much dimmed the light by half. I hope you get the drill of how the Phillips HUE bulb works now
2. Configuring the In-Room Control editor on the Cisco Video Codec
Part two of the puzzle is to make sure the Cisco codec has the right buttons configured and it triggers the correct events with proper event IDs. In order to do this you will need admin access to the codec. In case of a Spark registered endpoint you will have Integrator / Room Control access and you can do the same. Steps are exactly similar. Browse to the IP address of the codec and login with your credentials.

Once In-Room Control editor is launched, you will see a new window open up with options to add widgets, panels etc. Think of this as the on-screen layout with options to add buttons. Buttons , sliders and texts are what i am going to use here. I have two Phillips bulbs one in Bedroom and one in hallway that i want to turn on/off and dim lights using a slider.

Drag from the Widgets tab an on off toggle button for the Hallway On/Off and Bedroom On/Off panels. For the dimmer drag a slider. None of the widgets come with labels but you can drage Text widgets to the left and right, so the On , Off 0 , 255 Texts you see here are text widgets. Make sure you give a descriptive name to the Panel on left top. This name of the Panel is what you will see on the Touch 10 or DX80 as appropriate. Giving descriptive names for Widget ID's are also recommended as these names need to match with what you are using in your code logic to do different actions when these buttons are pressed. Make sure the ID of each widget is unique so that there is no overlap in names. One widget = a unique name.
One more thing to notice here is the availability of the panel setting on top bottom right hand side to Always or only during a call. For most situations leaving it at Always is the best setting unless you want to evoke a function on a panel mid-call.

When the layout is all set and done push the upload button top right to send the layout to the Codec. You will instantly notice the panel show up on the screen. Please note that you cannot do Kiosk mode today on these units. Call, Voicemail, Share buttons are going to stay as it is and cannot be removed. The additional panels custom created by end user will stack up after.


3. Configuring the codec to send event feedback
This phase is important because you have to send an API request to the HUE bridge to turn a bulb on off depending on state of the widgets above. Since the codec is not capable of sending anything more than when a button or widget is pressed or slided, you need an intermediate controller in order to process these events and then do some action based on the event. This is achieved in my case using a Raspberry PI loaded with Ubuntu, Cloud9 IDE, NodeJS with a ton of other libraries. You may use PHP or Python to achieve the same. The event configuration on the codec is done specific to each action that is happening on the codec. In this case I will show you how to configure widget event feedbacks
xcommand HttpFeedback register feedbackslot:1 serverurl:http://192.168.2.111/dx80:8080 expression: /event/UserInterface/Extensions/Widget format:JSON
Lets dissect this command above. I have a Raspberry PI with a web server that is listening on 8080 on the URL http://192.168.2.111/dx80 on port 8080. I setup the Raspberry PI with NodeJS and Express server to host this web server. When i push a button on the codec from the Hue panel, i am telling the Cisco Codec to send a JSON message to my webserver on the URL above. Information in the JSON data include Widget ID name of the widget that was pressed or slided and a value corresponding to on / off or in case of a slider current sliding value. Here is a sample of how the event looks like once you enter this command in the codec.

As you can see here when widget_5 was pressed to turn the bulb ON from OFF to ON state, an event feedback was generated and the value was set to ON. This data is sent over to the web server listed above. On the Raspberry PI end i have an express server configuration setup below to act upon receiving the event.

In this code i am looking at the Widget.Action.Value variable of the incoming Widget action and see if its on or off and calling a function called Hue() which takes the bulb number or ID as parameter and state of on or off. State of ON is identified as {"on":"true"} while State of OFF is identified as {"on":"false"}

The HUE Fn itself is a HTTP PUT to udpate the status of the bulb to On and Off respectively.
4. Configuring the slider for dimming
This can be a little more tricky than you think because you have a slider that you can dynamically slide up and down and there can be up to 255 values (256 different brightness levels). When you drag you are holding the touch scree until you release at the last value and that value has to be captured and sent over in the event. There are multiple events for this representing "Clicked" or "Released" and you should look for the "Released" event in order to capture the value of the slider on last release of the finger from the slider button. Once this data is sent you can capture the last value of the dim setting.

As you can see here user started at 0 and slide right till 49 and released his finger. The Widget Action type of "Released" indicates that the finger is off the touch screen and that is the value currently set on the slider. As you can see below for widget buttons with ID 3 or 4 (which are the dimming sliders on the DX80) i set the bulb values to 1 or 2 (these are the bulb IDs) and then i set the state of the bulb to ON: TRUE and Brightness level of 49 in this case i set it using "BRI": <value>. The HUE Fn then sets the bulb brightness to appropriate levels.
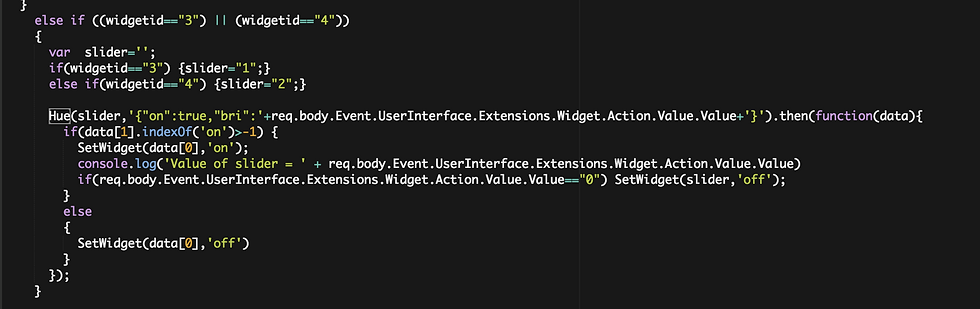
Its also important to note that if the bulb was turned on or off its important to have a script sit there and periodically sit there and query the HUE bridget for bulb status and brightness levels and update that status appropriately on the Video codec. This is to ensure that all states are updated and kept in sync. I wrote a function called SetWidget to set the state of bulbs appropriately on the codec for this. Codecs accept XML commands only in their body if you send a HTTP POST to execute a command. In this case i am executing a Xcommand UserInterface Extensions Widget SetValue value:<value> id:<id> command using XML HTTP POST.


Traditionally video conferencing has been in its own island and you have 20 devices inside a room to manage adding to the clutter. To add a lighting control in the conference room, you would need something like a Crestron to talk to a Crestron lighting controller and that too was mostly all non-IP and RS232 serial connections through which the communication happened behind the scenes. ALthough many of these A/V companies have enhanced their product line with IP enablement and API front ends, its still not end user friendly. Cisco's goal is to make sure that not only an end user can start a meeting at the push of a button, but also from an administration standpoint there are less components with in a room and the Codec (Touch10) can talk directly to other devices through an integration like this.
Although this is a very long post i hope you enjoyed the step by step on how to control your Hue bulbs from your Cisco video endpoints. The same can be done for Thermostats or other IOT enabled devices that have an API front end. Feel free to leave your thoughts and comments on this blog post and if you need help setting it up , feel free to message me.


Comments